
During the holiday break I started thinking about building a little mining-rig using some Raspberry Pi devices. During the holiday break I normally don’t have access to a PC, so I couldn’t do much apart from some research using my mobile. I came across a post titled ‘Mining Monero XMR Crypto Currency on Raspberry Pi’ by AndyPi. This post detailed how to setup a Raspberry Pi to mining XMR using Minergate mining pool and since I am already a user of the Minergate services it sounded like a perfect match.
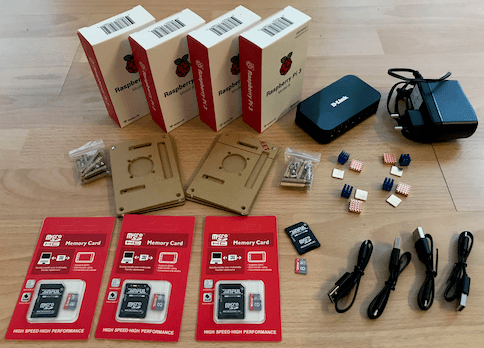
Next step was to make a list of hardware required to built the ‘mining-rig’, giving me the following list of items to be purchased
| Quantity | Item | Vendor/Shop |
|---|---|---|
| 4 | Raspberry Pi 3 Model B | SOS Solutions |
| 4 | SD Card (8 GB) | AliExpress |
| 4 | Cooling elements for Raspberry Pi | AliExpress |
| 2 | Raspberry Pi stack | AliExpress |
| 4 | Micro USB charging cable | AliExpress |
| 1 | D-Link DUB-H7 USB 2.0 Hub | Informatique |
 Mining-stack components
Apart from the Raspberry Pi’s I ordered all the required parts from AliExpress. With the shipment from all of these items from China I would be long home before any of these items would be delivered. The Raspberry Pi’s I ordered when back home, since the company I ordered them from has next-day delivery.
Using the parts list above I built the following
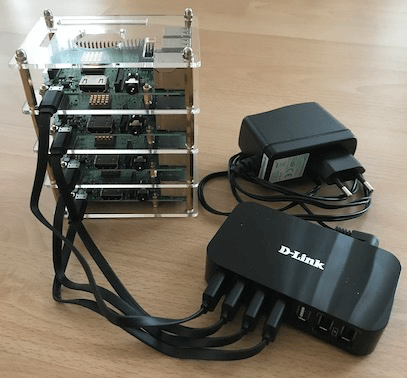 Mining-stack of Raspberry Pi’s
Will this mining rig be profitable… Nope, not by a long shot but it will be fun building it.
Installing Operating System Image
Since these Raspberry Pi’s will only be serving as servers I will be using the ‘Lite’ version of Raspbian. At the time of this writing the latest version is Raspbian Stretch Lite, version November 2017. You can download these images from the download page at the official Raspberry Pi Foundation.
Also I will be running these Raspberry Pi’s headless for which I then need SSH (Secure Shell) and as I am running out of empty slots in my router I will be connecting them to the network using the onboard WiFi (802.11n).
To write the image onto the SD card just following the instructions provided on the page ‘Installing operating system images - Raspberry Pi Documentation’
To enable SSH just place an empty file name ssh in root of the SD card (you can also use the command touch ssh to create it).
To enable WiFi place a file named wpa_supplicant.conf in the root of the SD card containing the following information. Please make sure to update the fields ssid and psk to match your wireless network.
ctrl_interface=DIR=/var/run/wpa_supplicant GROUP=netdev
update_config=1
network={
    ssid="YOUR_SSID"
    psk="YOUR_PASSWORD"
    key_mgmt=WPA-PSK
}
As soon as you startup the Raspberry Pi it will connect to the WiFi network specified in the file and it will have SSH enabled, allowing you to connect to it remotely like so using the default assigned hostname raspberrypi
ssh pi@raspberrypior using its IP address (check your router/DHCP server to determine the IP address assigned to the Raspberry Pi)
ssh pi@192.168.178.xxChange the default password for the pi-account
It is always good practice to not be using default passwords, so change the password of the pi-account using the passwd command.
Setting and update locale
When running certain commands on the Raspberry Pi it is expected that locale has been properly set. By default this is not always the case and you will see errors like the following appear
locale: Cannot set LC_CTYPE to default locale: No such file or directory
locale: Cannot set LC_MESSAGES to default locale: No such file or directory
locale: Cannot set LC_ALL to default locale: No such file or directory
Using the following steps you can fix these errors
Insert into /etc/default/locale
LC_CTYPE=en_US.UTF-8
LC_ALL=en_US.UTF-8
LANG=en_US.UTF-8
next perform the following commands
export LANGUAGE=en_US.UTF-8; export LANG=en_US.UTF-8; export LC_ALL=en_US.UTF-8; sudo locale-gen en_US.UTF-8
sudo dpkg-reconfigure locales
After these steps it is time to reboot your Raspberry Pi, issue the following command from the terminal
sudo rebootMake sure to be update to date
To make sure you are using the latest version of all the software already installed on your Raspberry Pi run the following commands
sudo apt-get update
sudo apt-get upgrade
Providing each Pi its own unique name
To be able to easily connect to each individual Raspberry Pi using its hostname it is advisable to provide each Pi with its own unique name. When your are logged into a Raspberry Pi your can start the Raspberry Pi Software Configuration Tool (raspi-config) by executing the following command from the terminal
sudo raspi-configThis will present the following menu
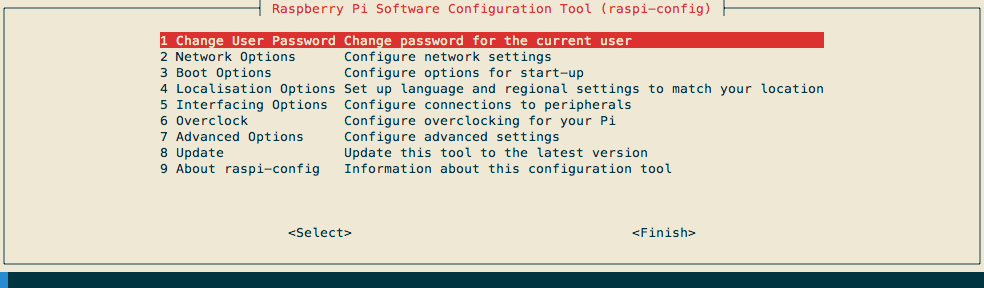 Raspberry Pi Software Configuration Tool (raspi-config)
Choose the option ‘Network Options’ followed by ‘N1 Hostname’ and your will be presented with a dialog detailing the rules to which a hostname should comply.
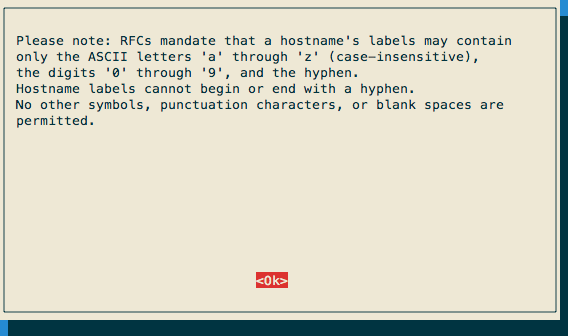 Hostname naming rules
Here your can specify a new hostname for the Raspberry Pi. I have named my units rpiminer01 through rpiminer04. To make these changes active the Raspberry Pi will need to be rebooted.
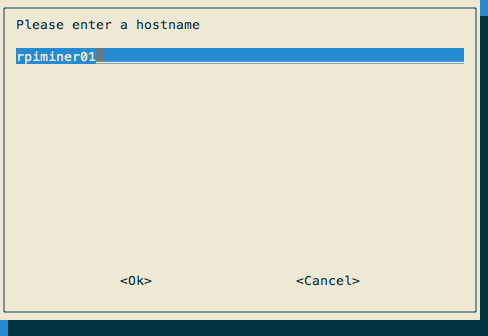 Change hostname
After accepting the changes you made (by pressing on <Ok>) you will be returned to the main menu, from the main menu select <Finish>. You will be presented with the question if you would like to reboot now, select <Yes> to reboot the Raspberry Pi.
Installing necessary tools
Since the Raspberry Pi’s will be running headless, but I still want to be able to monitor the miners to be installed I will be installing the Unix tool screen and git will be required to download the source code for the miner software.
sudo apt-get install screen gitInstalling and building the miner software
First we need to install same libraries required by the build process and miner software
sudo apt-get install autoconf libcurl4-openssl-dev libjansson-dev openssl libssl-dev gcc gawkNext step is to clone the git repository for the miner software
git clone https://github.com/tpruvot/cpuminer-multiThe following commands need to be executed to build/compile the miner
cd cpuminer-multi
./autogen.sh
./configure
./configure --with-crypto --with-curl
make
Testing the software using minergate pools
The following command start the cpuminer (a version of minerd)
./cpuminer -a cryptonight -o stratum+tcp://xdn-xmr.pool.minergate.com:45790 -u <Your email adress> -p x -t 4| Parameter | Explanation |
|---|---|
| -a | Hashing algorithm to be used |
| -o | Mining pool to be used |
| -u | Pool username, for Minergate this is your email address |
| -p | Pool password, for Minergate just use x |
| -t | Number of threads, since the Raspberry Pi has a quad-core processor use 4 |
** cpuminer-multi 1.3.3 by tpruvot@github **
BTC donation address: 1FhDPLPpw18X4srecguG3MxJYe4a1JsZnd (tpruvot)

[2018-01-27 19:39:56] Using JSON-RPC 2.0
[2018-01-27 19:39:56] CPU Supports AES-NI: NO
[2018-01-27 19:39:56] Starting Stratum on stratum+tcp://xdn-xmr.pool.minergate.com:45790
[2018-01-27 19:39:56] 4 miner threads started, using 'cryptonight' algorithm.
[2018-01-27 19:39:56] Stratum difficulty set to 1063
[2018-01-27 19:40:09] CPU #0: 1.44 H/s
[2018-01-27 19:40:09] accepted: 1/1 (diff 0.000), 1.44 H/s yes!
[2018-01-27 19:40:24] Stratum difficulty set to 500
[2018-01-27 19:40:41] CPU #2: 1.50 H/s
[2018-01-27 19:40:41] CPU #3: 1.49 H/s
[2018-01-27 19:40:42] CPU #1: 1.47 H/s
[2018-01-27 19:40:44] accepted: 2/2 (diff 0.000), 5.91 H/s yes!
[2018-01-27 19:40:51] CPU #0: 1.46 H/s
[2018-01-27 19:41:21] CPU #2: 1.53 H/s
[2018-01-27 19:41:22] CPU #3: 1.53 H/s
Everything seems to be working and we already got two valid shares. If you see messages like shown below appearing in the output
[2018-01-27 23:36:37] stratum_recv_line failed
[2018-01-27 23:36:37] Stratum connection interrupted
you might consider adding the parameter -T and specify a different timeout value, like so
./cpuminer -a cryptonight -o stratum+tcp://xdn-xmr.pool.minergate.com:45790 -u <Your email adress> -p x -t 4 -T 180Minergate support several other coins based on the CryptoNight/CryptoNote hashing algorithm. The following table lists the currently support mining pools for CryptoNight/CryptoNote based coins by Minergate. The last eight in the list enable you to use merged mining, i.e. mining two coins for the price of one.
| Coin | Pool URL |
|---|---|
| BCN | stratum+tcp://bcn.pool.minergate.com:45550 |
| XMR | stratum+tcp://xmr.pool.minergate.com:45560 |
| QCN | stratum+tcp://qcn.pool.minergate.com:45570 |
| XDN | stratum+tcp://xdn.pool.minergate.com:45620 |
| FCN | stratum+tcp://fcn.pool.minergate.com:45610 |
| MCN | stratum+tcp://mcn.pool.minergate.com:45640 |
| DSH | stratum+tcp://dsh.pool.minergate.com:45720 |
| INF8 | stratum+tcp://inf8.pool.minergate.com:45750 |
| XDN+XMR | stratum+tcp://xdn-xmr.pool.minergate.com:45790 |
| FCN+XMR | stratum+tcp://fcn-xmr.pool.minergate.com:45590 |
| FCN+QCN | stratum+tcp://fcn-qcn.pool.minergate.com:45600 |
| FCN+DSH | stratum+tcp://fcn-dsh.pool.minergate.com:45730 |
| FCN+INF8 | stratum+tcp://fcn-inf8.pool.minergate.com:45760 |
| MCN+QCN | stratum+tcp://mcn-qcn.pool.minergate.com:45670 |
| MCN+DSH | stratum+tcp://mcn-dsh.pool.minergate.com:45740 |
| MCN+INF8 | stratum+tcp://mcn-inf8.pool.minergate.com:45770 |
Auto start the miner on boot
To start the miner at boot time I have added the following commands to /etc/rc.local
# Start miner
cd /home/pi/cpuminer-multi
screen -dmS cpuminer ./cpuminer -a cryptonight -o stratum+tcp://xdn-xmr.pool.minergate.com:45790 -u <Your email adress> -p x -t 4 --no-color
By using screen the cpuminer is running in a detached screen and is running in its own shell.
Using the following command you will get a list of detached screens on the Raspberry Pi
sudo screen -listOn my Raspberry Pi this gives me the following output
pi@rpiminer01:~$ sudo screen -list
There is a screen on:
    499.cpuminer    (01/28/2018 08:48:29 AM)    (Detached)
1 Socket in /run/screen/S-root.
To connect to the cpuminer screen I can now issue the following command
sudo screen -r 499.cpumineror shorter (since there is only one named cpuminer)
sudo screen -r cpumineror even shorter (since there is only one detached process running)
sudo screen -rresulting in something like to following (i.e. the standard output from cpuminer)
** cpuminer-multi 1.3.3 by tpruvot@github **
BTC donation address: 1FhDPLPpw18X4srecguG3MxJYe4a1JsZnd (tpruvot)

[2018-01-28 08:48:22] Using JSON-RPC 2.0
[2018-01-28 08:48:22] CPU Supports AES-NI: NO
[2018-01-28 08:48:22] Starting Stratum on stratum+tcp://xdn-xmr.pool.minergate.com:45790
[2018-01-28 08:48:22] 4 miner threads started, using 'cryptonight' algorithm.
[2018-01-28 08:48:22] Stratum difficulty set to 1063
[2018-01-28 08:49:15] CPU #2: 1.27 H/s
[2018-01-28 08:49:15] CPU #3: 1.26 H/s
[2018-01-28 08:49:16] CPU #0: 1.25 H/s
[2018-01-28 08:49:16] CPU #1: 1.25 H/s
[2018-01-28 08:49:56] CPU #2: 1.53 H/s
[2018-01-28 08:49:56] CPU #3: 1.52 H/s
[2018-01-28 08:49:57] CPU #0: 1.50 H/s
[2018-01-28 08:49:57] CPU #1: 1.50 H/s
[2018-01-28 08:49:59] accepted: 1/1 (diff 0.000), 6.03 H/s (yes!)
[2018-01-28 08:50:37] CPU #3: 1.50 H/s
To leave this screen, but leave the process itself running, you need to press Ctrl+A and then press D (for detach).
[detached from 499.cpuminer]Update the Message of the day (motd)
By adding the following code to .bash_profile
let upSeconds="$(/usr/bin/cut -d. -f1 /proc/uptime)"
let secs=$((${upSeconds}%60))
let mins=$((${upSeconds}/60%60))
let hours=$((${upSeconds}/3600%24))
let days=$((${upSeconds}/86400))
UPTIME=`printf "%d days, %02dh%02dm%02ds" "$days" "$hours" "$mins" "$secs"`

# get the load averages
read one five fifteen rest < /proc/loadavg

echo "$(tput setaf 2)
   .~~.   .~~.    `date +"%A, %e %B %Y, %r"`
  '. \ ' ' / .'   `uname -srmo`$(tput setaf 1)
   .~ .~~~..~.
  : .~.'~'.~. :   Uptime.............: ${UPTIME}
 ~ (   ) (   ) ~  Memory.............: `cat /proc/meminfo | grep MemFree | awk {'print $2'}`kB (Free) / `cat /proc/meminfo | grep MemTotal | awk {'print $2'}`kB (Total)
( : '~'.~.'~' : ) Load Averages......: ${one}, ${five}, ${fifteen} (1, 5, 15 min)
 ~ .~ (   ) ~. ~  Running Processes..: `ps ax | wc -l | tr -d " "`
  (  : '~' :  )   IP Addresses.......: `ifconfig wlan0 | grep "inet " | awk '{ print $2 }'` and `wget -q -O - http://icanhazip.com/ | tail`
   '~ .~~~. ~'    Weather............: `curl -s "http://rss.accuweather.com/rss/liveweather_rss.asp?metric=1&locCode=EUR|NL|NL012|ROTTERDAM|" | sed -n '/Currently:/ s/.*: \(.*\): \([0-9]*\)\([CF]\).*/\2°\3, \1/p'`
       '~'
$(tput sgr0)"
export PS1="\[\e[0;34m\][\u@\h \w] \\$ \[\e[0m\]"
you will be greeted with the following message when connecting to the Raspberry Pi
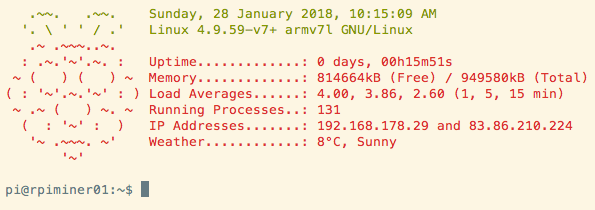 Message of the Day
You can make even cleaner by removing the static content from the file /etc/motd which by default contains the following text
The programs included with the Debian GNU/Linux system are free software;
the exact distribution terms for each program are described in the
individual files in /usr/share/doc/*/copyright.

Debian GNU/Linux comes with ABSOLUTELY NO WARRANTY, to the extent
permitted by applicable law.
Cleaning up
During the setup of the Raspberry Pi we have been entering a lot of commands which I don’t want to keep around it the history any longer. Issuing the following command wipes it clean
history -c
rm ~/.bash_history