
Reading temperature with Raspberry Pi
Project Description
The purpose of this little ‘project’ is to measure the current room temperature, report it to the console and based on the temperature turn one of three LEDs on.
Prerequisites
We will be doing the coding in Python, so we need to make sure we have Python Development toolkit installed and the RPi libraries as well.
sudo apt-get update
sudo apt-get install python-dev python-rpi.gpio
Since we will be using a 1-wire component, we need to install and build the libraries required to be able to make use of the DS18B20.
Parts Needed
| Amount | Part | Remark |
|---|---|---|
| 1 | DS18B20 | 1-wire digital temperature sensor |
| 1 | Yellow LED | |
| 1 | Green LED | |
| 1 | Red LED | |
| 3 | 1kΩ resistors | Pull-up resistors for the LEDs |
| 1 | 4.7kΩ resistor | I didn’t have one handy, so I used a 10kΩ resistor instead |
| 5 | M/F jumper wires | Connecting Raspberry Pi to the breadboard |
| 2 | M/M jumper wires | Connecting components on the breadboard |
| 1 | Breadboard |
Instead of one 10kΩ resistor I could also have used two 10kΩ resistors in parallel. This would have given me a 5kΩ resistor value ( 5kΩ = 1 / ( 1/10kΩ + 1/10kΩ ) ).
Wiring
Initially I got the wiring from, I mistakenly swapped pins 1 and 3 of the DS18B20 and it got hot very quickly. When this happens turn of the Pi and disconnect the wires immediately and wait for the sensor to cool down, and correct the wiring before booting up your Pi again.
For the 1-Wire interface a single GPIO pin is used, in recent Raspbian “wheezy” releases the GPIO-4 pin is used.
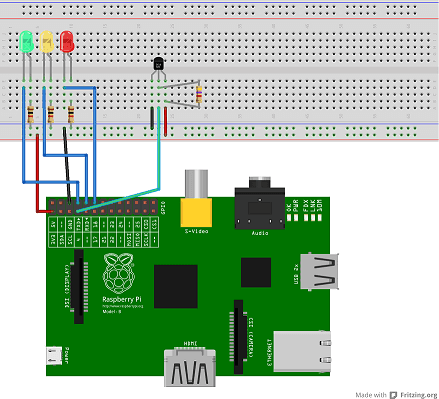 Wiring diagram
NOTE: The diagram above has been created with Fritzing
Code
The following Python script is a modified version of the script that can be found over at Adafruit. What is added is that based on the current room temperature one of three LEDs is turned on according to the temperature ranges show in the table below
| Temperature | Active LED |
|---|---|
| Below 27 °C | Green |
| Between 27 °C and 29 °C | Yellow |
| Above 29 °C | Red |
import os
import glob
import time
import RPi.GPIO as GPIO

os.system( 'modprobe w1-gpio' )
os.system( 'modprobe w1-therm' )

base_dir = '/sys/bus/w1/devices/'
device_folder = glob.glob( base_dir + '28*' )[0]
device_file = device_folder + '/w1_slave'

GPIO.setmode( GPIO.BCM )
GPIO.setwarnings( False )

def ledMode( PiPin, mode ):
  GPIO.setup( PiPin, GPIO.OUT )
  GPIO.output( PiPin, mode )
  return

def read_temp_raw():
    f = open(device_file, 'r')
    lines = f.readlines()
    f.close()
    return lines

def read_temp():
    lines = read_temp_raw()
    while lines[0].strip()[-3:] != 'YES':
        time.sleep(0.2)
        lines = read_temp_raw()
    equals_pos = lines[1].find('t=')
    if equals_pos != -1:
        temp_string = lines[1][equals_pos+2:]
        temp_c = float(temp_string) / 1000.0
        temp_f = temp_c * 9.0 / 5.0 + 32.0
        return temp_c, temp_f

# Make sure all used pins are low (i.e. LEDs are off)
ledMode( 14, GPIO.LOW )
ledMode( 15, GPIO.LOW )
ledMode( 18, GPIO.LOW )

while True:
        temp_c, temp_f = read_temp()
        ledMode( 14, GPIO.HIGH if temp_c < 27 else GPIO.LOW )
        ledMode( 15, GPIO.HIGH if temp_c >= 27 and temp_c < 29 else GPIO.LOW )
        ledMode( 18, GPIO.HIGH if temp_c >= 29 else GPIO.LOW )
        ts = time.strftime('%Y-%m-%d %H:%M:%S', time.localtime())
        print '{0} - Temperature = {1:.2f} C ({2:.2f} F)'.format( ts, temp_c, temp_f )
        time.sleep(1)
The Result
Raspberry Pi and breadboard
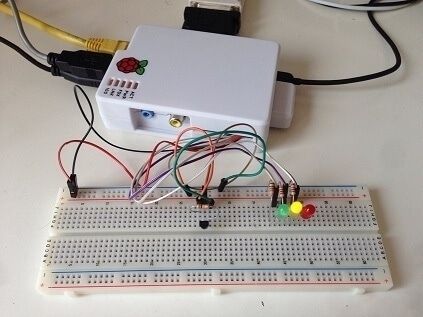 Raspberry Pi and breadboard
Python script doing its thing
 Python script doing its thing
Next Steps
- Add more sensors (already ordered a DHT22)
- Log data to a database and add rudimentary charting
- Add alerts (for instance if the temperature rises more than 5 degrees within a couple of minutes)