
Renewing APNS certificates (iOS)
This article assumes that you already have a valid Developer license and an iOS application setup with push notifications. You can find more information on this topic in the Local and Push Notification Programming Guide (iOS Developer Library).
This article only describes the steps involved in creating the certificates necessary to be used with a back-end server process for sending push notifications to your application out in the wild…
This post serves both as a means of sharing the knowledge and documenting the process I follow each year for the production certificates and every three months for the development certificates.
I used to keep a single printed sheet detailing all of the steps (of which I have no clue from where I printed it) involved. With this post I again have a backup of the process.
1] Request Certificate From a Certificate Authority
In the Applications folder on your Mac, open the Utilities folder and launch Keychain Access.
 Keychain
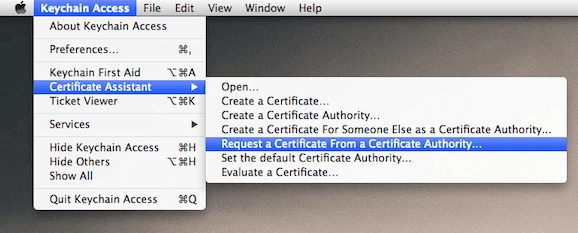
Within the Keychain Access drop down menu, select Keychain Access > Certificate Assistant > Request a Certificate from a Certificate Authority
- In the Certificate Information window, enter the following information:
- In the User Email Address field, enter your email address
- In the Common Name field, create a name for your private key (I use the format ’
Sandbox/Production’) - In the Request is group, select the “Saved to disk” option
- Click Continue within Keychain Access to complete the CSR generating process.
2] Create Apple Push Notification certificates
Since there isn’t an option to renew your APNS certificates, I create news ones (don’t delete your existing certificates yet) and put them through a test run first. When they have proven to be correct you can delete the old ones.
To create these certificates, login in to the Developer Portal and to go ‘Certificates, Identifiers & Profiles’ and select ‘Certificates’. Click op the ‘+’ button to start creating the certificates.
 Create certificate
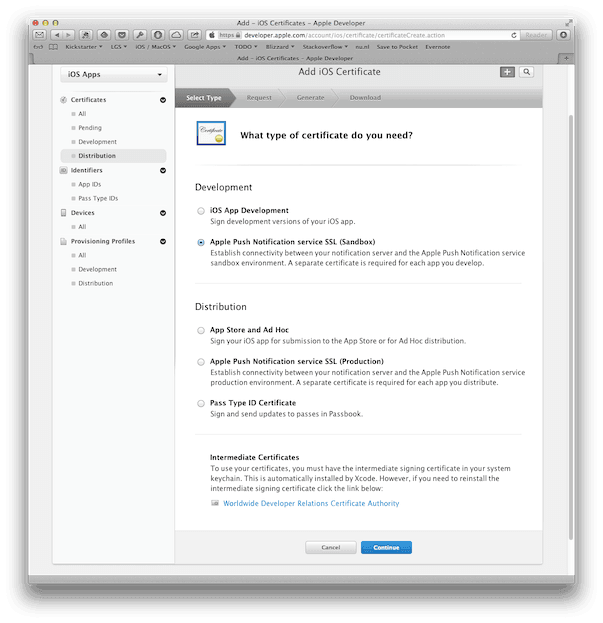
Follow the steps once for ‘Apple Push Notification service SSL (Sandbox)’ and a second time for ’Apple Push Notification service SSL (Production).
When asked to upload the CSR file choose the file you have created in the first step (CertificateSigningRequest.certSigningRequest). Download the certificates (aps_development.cer and aps_production.cer)
3] Importing the new certificates into your Keychain
To import both certificates into your Keychain by double click them in the Finder.
4] Exporting certificate and key
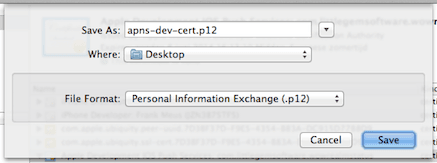
Select certificate ‘Apple Development IOS Push Services: xx’ (xx represents the identifier for your application) and export it to apns-dev-cert.p12. Expand the certificate just exported and select the personal key and export it to apns-dev-key.p12.
 Exporting certificate
5] Converting to PEM
To be able to use the certificate and key they will need to be converted to a different format. You can use the following commands to convert both the certificate and the personal key.
Converting the certificate
openssl pkcs12 -clcerts -nokeys -out apns-dev-cert.pem -in apns-dev-cert.p12Converting the personal key
openssl pkcs12 -nocerts -out apns-dev-key.pem -in apns-dev-key.p126] Removing passphrase
If you choose to use the personal key without a pass phrase, you can use the following command to remove it
openssl rsa -in apns-dev-key.pem -out apns-dev-key-noenc.pem7] Combining key and certificate
Finally we need to combine the certificate and the personal key into one single file. You can do so using the following command
cat apns-dev-cert.pem apns-dev-key-noenc.pem > apns-dev.pemNow repeat the steps 4 through 7 and do the same for the Production certificate and personal key.
8] Testing the new certificates
To test these newly created certificates I am using a little piece of PHP code (available on GitHub)to see if I can successfully send notifications to Apple’s service and that they actually get received on an actual device.
Correct the values for fields cert, passphrase and token to match your environment. If you have decided to remove the pass phrase from the PEM file, then use the value ’’ (empty string) as pass phrase.
Make sure you have copied both apns-dev.pem and apns-prod.pem into the folder you execute the PHP script from (or change the cert entries to include the fully qualified path to each of the PEM files)
<?php
/* Production settings */
$production = array( 'ssl' => 'ssl://gateway.push.apple.com:2195'
                   , 'cert' => 'apns-prod.pem'
                   , 'passphrase' => ''
                   , 'token' => '<insert device token>' );

/* Development settings */
$development = array( 'ssl' => 'ssl://gateway.sandbox.push.apple.com:2195'
                    , 'cert' => 'apns-dev.pem'
                    , 'passphrase' => ''
                    , 'token' => '<insert device token>' );

/* Send push notification */
function send_apns( $config ) {
    $ctx = stream_context_create();
    stream_context_set_option( $ctx, 'ssl', 'local_cert', $config['cert'] );
    if ( $config['passphrase'] != '' ) {
        stream_context_set_option( $ctx, 'ssl', 'passphrase', $config['passphrase'] );
    }

    /* Open a connection to the APNS server */
    $fp = stream_socket_client( $config['ssl'], $err, $errstr, 60, STREAM_CLIENT_CONNECT|STREAM_CLIENT_PERSISTENT, $ctx );

    if (!$fp) { exit( "Failed to connect: $err $errstr" . PHP_EOL ); }

    echo 'Connected to APNS' . PHP_EOL;

    /* Create the payload body */
    $body['aps'] = array( 'badge' => 1
                        , 'alert' => 'Test Push Notification'
                        , 'sound' => 'default' );

    /* Encode the payload as JSON */
    $payload = json_encode( $body );

    /* Build the binary notification */
    $msg = chr( 0 ).pack( 'n', 32 ).pack( 'H*', $config['token'] ).pack( 'n', strlen( $payload ) ).$payload;

     /* Send it to the server */
    $result = fwrite( $fp, $msg, strlen( $msg ) );
    echo (!$result)? 'Message not delivered' . PHP_EOL : 'Message successfully delivered' . PHP_EOL;

    /* Close the connection to the server */
    fclose( $fp );
}

/* Send out push notification using development and production config */
send_apns( $development );
send_apns( $production );
?>
Execute the script using the command
php apns_test.phpIf everything has been setup correctly the you would receive the following output
Connected to APNS
Message successfully delivered
Connected to APNS
Message successfully delivered